A functional kitchen requires a long-lasting worktop that is easy to maintain and keep hygienic.
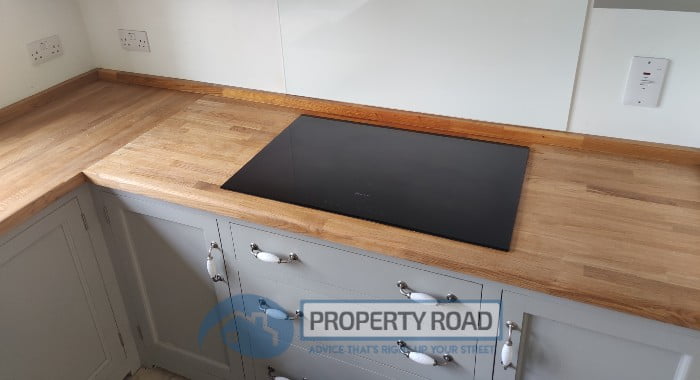
We have a wooden worktop in our kitchen and while there is some level of maintenance to it, it looks fab and is easy to keep clean.
Wooden worktops are naturally durable and work well with a range of styles for an aesthetic feature too. Once you’ve chosen the right worktop for your home, it’s time to install it.
The good news is you don’t need to hire a professional to help you – our ultimate guide to fitting a wooden worktop will cover all the necessary steps for a great result you can be proud of.

Which wood to choose
There are various woods to pick from when purchasing a wooden worktop, from oak and pine to ash or beech, which makes choosing the right option tricky.
Oak is up to 15% denser and hard-wearing, making it a popular choice for many property owners.
An oak worktop, whether you opt for classic or rustic, is an addition to your kitchen that will last a lifetime and will resist ageing, making it a cost-effective solution.
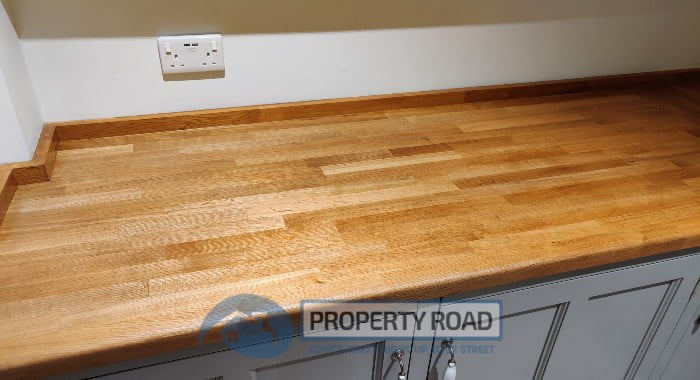
I’ll be honest, I’m not sure what type we have as it was installed by previous owners but if I had to guess I’d say ours appears to be oak. Given our property is an 1850’s rural cottage, that would make sense for the style.
For a modern kitchen, maple or beech work well as they are paler woods which allows you to experiment with a bolder colour scheme elsewhere in the room, while walnut or cherry woods are more indulgent and provide warmth and elegance to your kitchen.
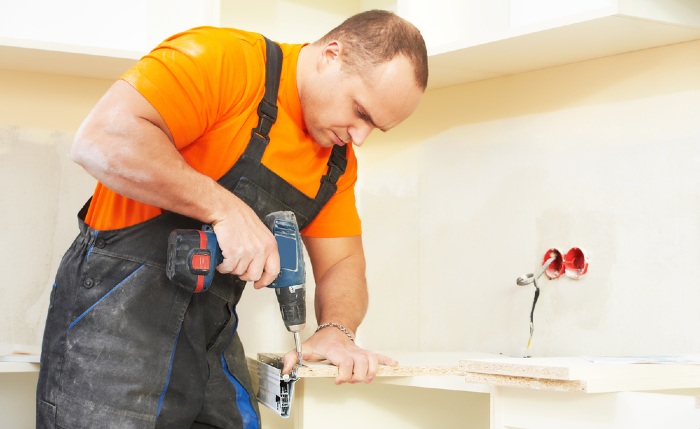
Before Installation
Before you can begin installing your worktop, you will need to prepare the materials and make sure you’ve measured everything correctly for the right fit.
Double check all measurements before you start making cuts in the wood. If you’re replacing an old worktop that fits correctly, you can use this as a template.
Kitchens can be humid places so, when you’re measuring, make sure you allow for movement from temperature changes or humidity – allow for between 4 to 5mm around walls and appliances.
It is also worth making a few practice cuts on a spare section of the worktop to check the direction you’ll be cutting the worktop will provide you with the cleanest edge.
Step 1: Scribe for a Perfect Fit
To begin, you need to ensure that the worktop is being installed against a flat surface. Walls are rarely completely straight, so you might need to scribe the surface to achieve an even overhang over the units if there’s a gap larger than 4mm.
Scribing is the term for cutting the worktop to match the shape of the wall by cutting a line from the back to avoid gaps against the wall.
Step 2: Drilling
Determine where you want to fix the worktop to the units – there should be three screws at the back of the unit and three at the front for a secure fit.
When you’ve decided on the positioning, drill 4mm holes into the base units and then into the base of the worktop, aligning the holes with the base units.
Don’t drill too far into the worktop as this will show on the surface – you can use a piece of masking tape on your drill bit to keep the holes consistent in depth. You can then fix the worktop in place using 4mm screws.
Step 3: Butt Joints or Mitre Joints
If you need to fix two worktop sections together, such as for a corner, you’ll need to create a butt joint or a mitre joint if the worktop has a radius.
Make sure you use three standard worktop bolts on each joint and seat the end grain using an appropriate sealant, which will securely hold the worktops together while still allowing a small amount of movement if the wood expands or contracts with temperature changes.
Step 4: Use A Template to Outline
With the worktop secured, you can outline any holes that need to be cut, such as for your sink. A new sink will likely come with a template, or you can use your existing sink by turning it upside down to draw around it in pencil.
Remove the sink or template and mark the overlap needed to enable the lip of the sink to sit on the worktop. Draw carefully with a ruler to ensure the lines are straight inside the template line.
Then, drill four holes into each corner of the inner line so you can use a jigsaw to cut through the worktop. Seal the cut edges to prevent water damage from ruining the worktop once the sink is in place.
Step 5: Finishing Touches
When the worktop is secured and you’ve cut out any holes or sections needed for your sink or appliances, you can apply a silicone sealant along the back edge of the worktop where it meets the wall to prevent water and moisture from dripping down the back of the worktop.
It’s also a good idea to protect the wood with a food-safe protective oil to provide a hard wearing finish.
Maintaining A Wooden Worktop
One of the issues we’ve found with having a wooden worktop is that you have to be careful what products you use on it.
If you leave anything wet on the surface, it’ll likely leave marks. If you spill anything on the surface, it will cause stains (unless removed fairly quickly). Even water standing on the surface too long will leave a mark.
You also need to be careful what products you use on it.
As wood is naturally antibacterial, we avoid any kitchen sprays and just wipe surfaces down with a damp cloth. This keeps surfaces clean and stain-free which reduces the amount of maintenance you need to do.
A well looked after wooden worktop might only need a new coat of oil applying over the previous coat every 6 months or so to keep the wood fresh and water-repellent.
Sanding & Removing Stains
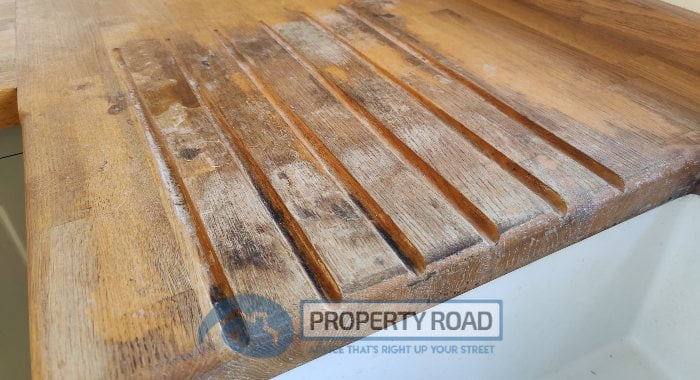
Unfortunately, these are all things we learned through trial and error in our first year of living with a wooden worktop. As a result, we ended up with several stains that needed deeper treatment.
To remove stains, your only real option is to sand down the surface until the stain has disappeared and then re-oil it. And if you’re doing that, you really have to do the entire worktop. It doesn’t work well to do small patches.
That’s what we had to do in order to restore our worktop to it’s former glory.
The first time we didn’t sand the worktop down enough and then applied the oil too thick. The result was a sticky worktop! So, we had to re-do again from scratch and this time we made sure we got it right.
The equipment we use to sand down our wooden worktop:


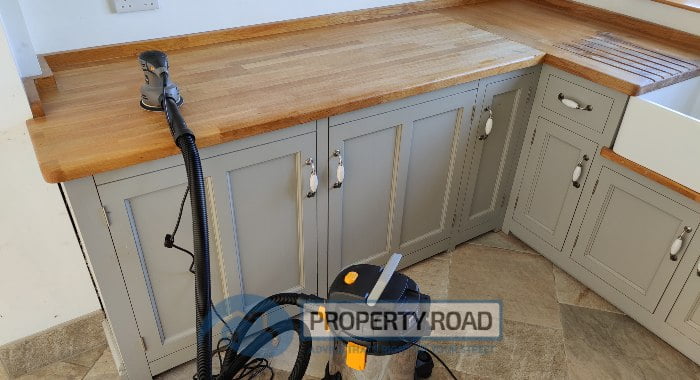
We used an orbital sander attached to a wet & dry vacuum in order to keep dust to a minimum – after all, it’s a kitchen so we didn’t want everything coating in dust!
Despite this, we still found it useful to wear a dust mask and googles.
On the sander, we used 80 grit sandpaper to prepare the surface, stepping down to 60 grit for heavily stained areas. We then went over everything with a 120 grit sandpaper to prepare the surface for oiling.
Keep in mind you’ll go through quite a few pads. We used about 10-15 pads of the 60 grit sandpaper and 5 or so of the 120 grit.
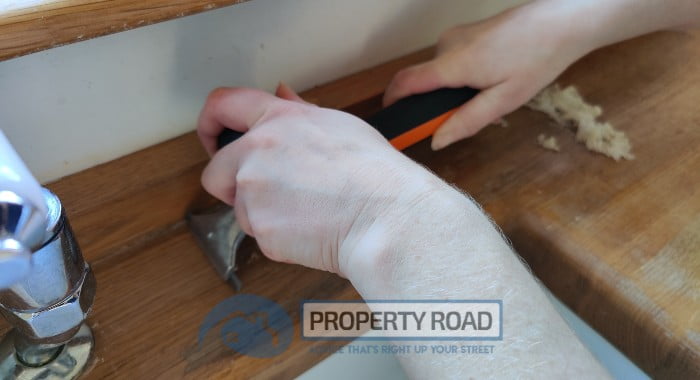
We used a carbide blade furniture scraper too. This was useful in the more delicate spots such as around the sink and taps and on the corners of the worktop.
We also found it was useful to use this first in any areas where you have heavy or sticky patches of oil or varnish. It helps to stop the sander getting clogged up!
We found that getting rid of heavy stains really takes a lot of time, even with all of this equipment to hand. In the end, we settled on getting rid of visible stains, but anything that will remain covered (such as under the draining rack), we just did the best we could. We’ll probably try and get more off the next time we do it.
Applying the oil
Once we had prepared the surface to a pale and nicely even surface with no trace of oil (and as stain-free as we could manage in the time we had), we were ready to re-coat it!
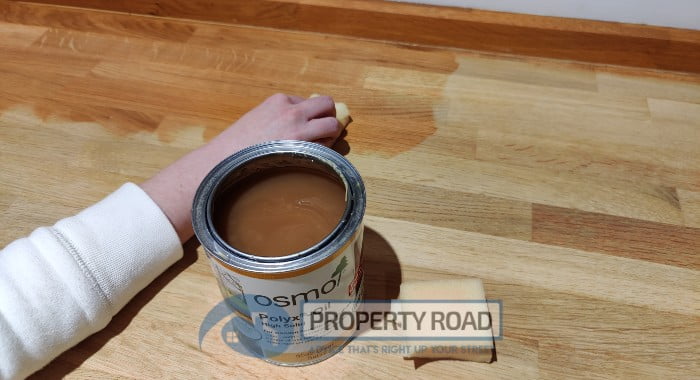
We used Osmo Polyx oil mostly because that’s what the previous owners had used and it seemed to work well but also as it has a very good reputation.
The instructions mention using a microfibre roller, but we decided to use a new washing up sponge which we cut into halves (so they could be dipped in the tin).
It’s surprising how little you need on the sponge so you need to be careful as you want a thin coating. We used two sponges at a time, one would dip into the oil and rub in circular motions in to the wood, the second one would be worked along the grain to help remove any excess oil.
After each coat you need to leave it quite a long time. We found it dried to the touch very quickly, but we left it for 10-12 hours between coats. We ended up doing 3 coats.
In truth, a 4th coat probably wouldn’t have done it any harm. Perhaps we had spread it too thinly? However, we know our worktop looks great again and is back to being water-repellent. We plan on doing another coat every 6 months but without all the sanding.
Little and often is key
While the process of sanding everything down and re-coating from scratch is quite labour-intensive (it took us around 9-10 hours in total), once you get it done the ongoing maintenance should be relatively quick and simple.
The key is to not let things deteriorate to the point where you need to remove marks and stains.
If you can do this, simply applying a new coat of oil every 6 months really isn’t that difficult. It only took us around 30 minutes to complete a coat on our worktop.
So, as you can see, fitting a wooden worktop is only part of the battle! If you want to ensure your worktop looks good and lasts a long time, make sure you keep on top of the oiling.
If you can do this, wooden worktops are a beautiful-looking, hard-wearing surface that last for years.