
Overall Rating:
4.5/5
Effectiveness = 4.8
Ease of Application = 4.2
Value for Money = 4.4
*** Review Based On Our Real-World Experience Of Using Wallrock Thermal Liner ***
PROS:
- Extremely effective at preventing cold-feeling walls
- Helps stop damp caused by condensation
- Reduces heat loss without adding noticeable thickness to the wall
CONS:
- Fiddly to install around windows and doors
- The upfront cost is fairly high
Check current stock levels, price, and reviews on Amazon
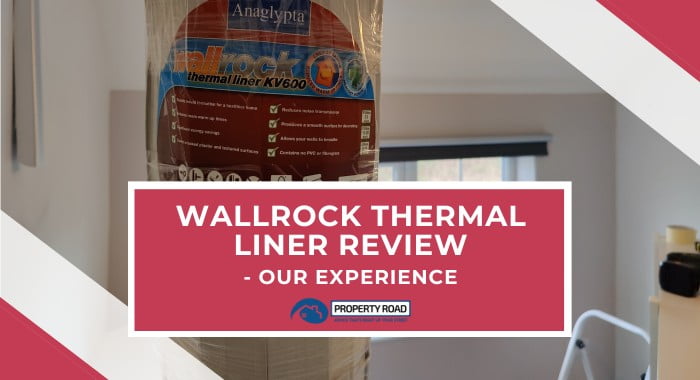
Wallrock thermal liner review – It is claimed to help reduce heat loss through uninsulated solid walls by up to 36%, as well as being a solution to damp caused by condensation.
However, it’s also pretty expensive stuff so we decided to apply it to one of our uninsulated solid walls to see just how good this stuff is.
This Wallrock thermal liner review is, therefore, based on our real-world experience of buying and installing Wallrock KV600 ourselves.

Note: We are not DIY experts, in fact, we had never even wallpapered a room before. So, you’re about to learn how NOT to apply this stuff, as well as how to actually do it and what benefits you can expect to see!

At A Glance – A Quick Summary
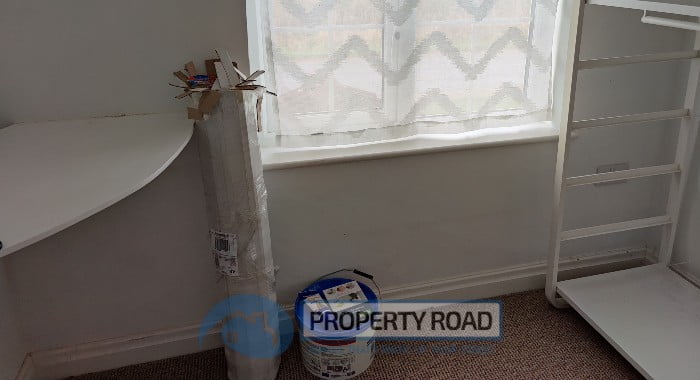
Our 1850’s rural home has solid brick walls that are difficult to insulate any other way. In winter, the walls are so cold and often attract condensation so we bought Wallrock KV600 as a solution.

- Wallrock KV600 Thermal Liner
- 100x25cm
- White
We found the process of installing the Wallrock easier than we expected, but because it’s such thick paper (about 0.4cm thick) it is a bit fiddly, especially around the window recess.
We found it easiest to mark the cut lines with a pencil, then use sharp scissors to cut carefully. Using a knife created a rougher edge or teared the paper leading to visible joins.
However, going over the joins with flexible Polyfilla helped hide them once the wall was painted. If you want to cover up the joins further, there’s a special paper you hand over the top before painting.
We didn’t feel this was necessary in the room we used it in (a dressing room), but we would probably do it if we put it in a more important one such as a lounge or bedroom.
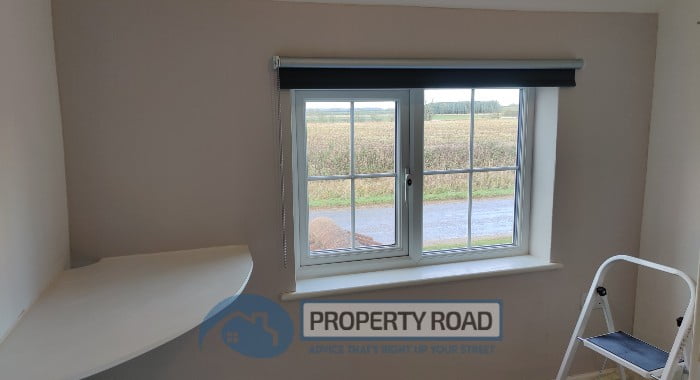
Painting over the paper was fine, and we only needed two coats of paint. Attaching a blind and a shelf to the wall was no problem either. While the wall feels a little softer, it’s still pretty firm and feels robust.
Overall, it’s quite amazing just how much warmer the wall is to the touch. It’s literally turned an icy cold wall into a lovely warm that feels similar to an internal wall.
We’ll update again once we’ve been through a full winter but, based on the warmth of the wall now, we do not expect to have any more issues with condensation. We also expect we’ll save money on our energy bills.
Update: We are now at the end of February, and it’s been a couple of winter months since we wrote this Wallrock thermal liner review. As the room we used it in was small, we haven’t noticed any significant savings on our heating bills. However, the room itself is a little warmer, so we are confident it’s having a positive effect!
Our Story – Why We Needed Wallrock Thermal Liner
We bought our 1850s rural former-farmhouse in 2021 having been used to living in more modern city properties all our lives.
We soon found out that character properties often come with their own quirks and charms. One of ours was that the old solid brick walls that made up most of the property became like walls of ice in winter!
This also had the added issue of the cold walls attracting condensation which would then turn to mould and damp.

After high energy bills in the first winter, we looked at ways to make the property more energy efficient. The two main options were either external wall insulation, or internal wall insulation.
It quickly became apparent that external wall insulation wasn’t possible for us. It’s expensive enough as it is, but our roof doesn’t overhang the walls enough and so would need to be replaced if we wanted external wall insulation. This made the whole idea prohibitively expensive.
But internal wall insulation wasn’t ideal either since adding around 6-10cm of thickness to the walls internally would make our rooms too small – especially as some rooms have three external walls (meaning we would lose up to 30cm of room space).
The Alternative Option To Expensive Insulation Options…
Then we stumbled upon Wallrock KV600 thermal liner which had impressive claims about the benefits of applying it to your walls. So we decided to conduct a Wallrock thermal liner review!
The key claims from the manufacturer include:
- Reduce room warm-up time by up to 65%
- Improve the thermal performance of an uninsulated solid brick wall by up to 36%
- Stop condensation that leads to damp and mould problems
- Cover up minor damage to wall surfaces
Plus, it’s breathable so won’t make the room ‘sweat’ and you don’t have to be a specialist to install it – a small amount of DIY knowledge will suffice (or you could hire a painter and decorator).
We proved this by deciding to take on the job of installing the Wallrock paper ourselves. This was despite never having even hung standard wallpaper before!
While the liner isn’t the cheapest, it’s still much more cost-effective than any of the other options we looked at. Don’t get me wrong, you get what you pay for, so we weren’t expecting major results from Wallrock.
However, it felt like the best option available to us, and so we decided to take the plunge! As we decided to install it ourselves, let’s look at the process in more detail…
Equipment – What We Used


The table above shows the key things we used as part of our Wallrock thermal liner review.
Obviously there was the Wallrock KV600 which is the thickest of the thermal lining papers the company does. We also bought the adhesive paste that is produced by the company to make sure we got a firm hold.

A pair of sharp scissors is a must and a wallpaper smoother or brush is a massive help in ironing out creases and making sure there are no air bubbles.
We also used flexible gap Polyfilla as recommended by the manufacturers of Wallrock to help stop cracking.
Finally, a spirit level is handy for getting straight lines for marking where to apply the paste or knowing where to cut the paper.
Applying Wallrock Thermal Lining Paper
Getting the Wallrock thermal lining paper on to the walls isn’t that much different to applying wallpaper (so I’m told!), though there are a few noticeable differences.
For starters, you have to apply the Wallrock adhesive to the wall, not the paper whereas I know some people wallpaper by applying the paste to the paper then sticking it to the wall.
Secondly, Wallrock is much, much thicker and heavier than normal wallpaper, so it doesn’t bend around corners very easily and extra care has to be taken on cuts.
We found the best technique for us was to hold the Wallrock paper up to just above the height of the wall, then mark just below the skirting board. We then cut it (making sure we had a bit to spare) so we could handle the paper easier without it being attached to the rest of the roll.
Then, we drew a vertical line on the wall 1m from the start of the wall. This allowed us to see where we needed to apply the adhesive up to. You don’t want to apply further than you need as it will dry fairly quickly, and it dries very hard.
We applied the adhesive very generously using a thick pile paint roller and a brush for cutting in around the edges.
Sticking To The Wall

Then it was a case of lining the paper on the wall and pressing it into place. You’ll notice once stuck, the paper doesn’t really move. This is both useful and problematic at the same time.
It’s useful because it means once you’ve got it in place, you don’t have to worry about it moving around or peeling off. However, it’s also a problem because if you don’t line it up correctly, you have to unpeel and try again, you can’t just push or pull it into place.
We found it easier to overlap the edges of the wall and skirting (but not the paper!) and trim to fit because none of the walls in our house are straight anyway!
Once in place, press down firmly all over and push the paper into the edges using a wallpaper smoother. We then scored the edge using the side of a wallpaper scraper, then ran a pencil down the line. This gave us a perfect line for cutting.
You can then peel the paper away from the wall and use sharp scissors to cut the line. With trial and error we found scissors to be easier to get a smooth line. If you use a knife and the blade isn’t razor sharp, it tends to pull the furry ‘blanket’ of the paper out and makes it hard to get a nice finish.
Dealing With The Window Recess
Applying the Wallrock thermal lining paper to plain walls was a very simple and fairly quick job. However, we found that once we reached the window reveal, things got much more complicated.
The main issue is the thickness of the paper means that when you try and stick it over a corner into a window or door recess, the paper pulls away from the wall.
We read somewhere that you can moisten the paper to allow it to ‘stretch’ around the corner, but this seemed difficult and risky to us.
There were then two main options, either using separate pieces for the recess and butting the paper together, or creating a score along the corner, so the tension in the paper was ‘released’.
For the purpose of this Wallrock thermal liner review, we chose to try both methods.

The result? We found creating a score gave a better finish. With this, you wrap the paper around then use a knife to score along the corner. We found using a straight edge helped to get a neater finish.
When you get to the windowsill, you’ll need to cut a line along the middle of the sill up to the edge, then make a small snip up, and a further one down. This will allow you to push the paper to the wall then trim to fit using the same method as along skirting boards and ceilings.
- Wallrock KV600 Thermal Liner
- 100x25cm
- White
Dealing With Electrical Sockets Or Light Switches
One thing we did really struggle with was getting a neat finish around sockets and switches. We tried to simply cut around the socket without removing it, and we ended up with a fairly large gap around it.
In hindsight, we shouldn’t have tried to cut corners (no pun intended!). Instead, we should have removed the socket completely as this would have made it much easier to mark out where we needed to cut the paper.
Joining Paper Up
We’ve been pleasantly surprised with how little you can see where the rolls of paper join up once it’s all been painted. You can still see them but only if you look closely.
The advantage of using the 1m wide roll of Wallrock KV600 was that we also had fewer joins. This is worth keeping in mind if you’re concerned about join lines.

Filling In Gaps
Once all the paper was up, we left it alone for 24 hours to give the adhesive time to dry and start to cure. Then we went around with our flexible gap Polyfilla.
Basically, any gaps between rolls or around edges we smoothed some Polyfilla over. I do urge you to use it sparingly though as we found the Wallrock isn’t very forgiving if you need to sand down any filler. You soon start wearing away the paper and exposing the fleece-like fibres underneath.
Painting Over The Paper
After leaving the Polyfilla to dry for 24 hours, we then applied two coats of wall paint. The first coat seemed to use a fair bit of paint as the paper soaks it up a bit. However, the second coat went on nicely.
We found that two coats was enough and using a lighter colour of paint helped with the final finish too. While we got better at applying the paper as we went along, some of the first bits we put up weren’t perfect, and I think a darker coloured paint would highlight the imperfections!
Overall though it looked great after two coats of paint and I don’t feel we missed out by not applying lining paper over the top of the thermal liner.
The End Result

So, what did it look like at the end? Well, you can judge for yourself, but we were pretty pleased with the finished look.
Sure, there are a few imperfections, but they mostly came due to our lack of experience and the trial and error nature of our Wallrock thermal liner review.
We’d definitely recommend starting in an area you won’t notice as much as you will get better as you go along. But if you take your time and plan ahead, you get a pretty nice finish.
So, What Benefits Have We Gained?
The immediate benefit you notice is that the walls with Wallrock thermal liner applied are much warmer to the touch.
Whereas previously they were almost painfully cold, they now feel like an internal wall. There is almost no hint of cold coming through – it’s actually quite remarkable.
This means when we are next to the wall, we don’t feel the cold radiating out towards us. It also means we no longer have to worry about condensation forming on the walls and producing mould and damp.
But the big question is whether it has saved us money on our energy bills?
Well, to tell the truth, the jury is still out on that one as we haven’t been through a whole winter to be able to tell. However, the room definitely does feel a bit warmer.
It stands to reason that now the walls are no longer cold, they must be doing something to improve heat retention. With that in mind, we are very optimistic that our bills will be reduced as a result.
Our Opinion – Is Wallrock Thermal Liner Any Good?
Let’s be honest, Wallrock thermal liner is not cheap, especially if you go for the best one they do, the KV600 as we did.
If you’re expecting massive savings on your energy bills simply by installing 4mm thick paper, you’ll probably be disappointed.
However, our Wallrock thermal liner review has shown that it’s a relatively cost-effective insulation method that can be a DIY job (even if you’ve never hung wallpaper before!).
As long as you’re not expecting miracles in terms of energy bill reduction, there are some real benefits to be had on reducing room warm-up time and preventing condensation that leads to mould and damp.
For that reason, we highly recommend Wallrock KV600 and will definitely be looking to install it in some of our other rooms that have cold uninsulated solid brick walls.
- Wallrock KV600 Thermal Liner
- 100x25cm
- White